Wednesday, 21 September 2011

Time

Now that I completed my studies I have so much time, but still - time goes by so fast when you search for jobs and write applications. But there's still enough time for sewing. When I started sewing I used my mum's ironing board. After a while I bought my own in Ikea - a mini tabletop ironing board.


So, after using it a two years or so it became pretty dirty. The main reason for this is fusible interfacing (note to self: protect the board every time you use it). The glue didn't go out even after washing. Then I decided to make a new cover. Ok, I admit, the old cover got a bit boring, too. I traced the old cover onto the paper and cut it in fabric. I used bias tape for the edges. I left 2.5 cm/1" opening left on the wrong side of the fabric so I could insert a string into the tunnel. Then I just put the felt and the cover over the board, pulled the string tight and tied a knot.


I still have to buy some cotton felt, because the felt that came with the board became very thin and therefore leaves marks on the fabric when you iron it. Not good. Anyway, I love the new cover and I'm already planning to make a few more to stock when this one needs washing.

Friday, 16 September 2011

Sewing notions: tailor's ham & seam roll

I had a wonderful vacation and a few lovely weeks of procrastination after it. But I'm back now, with a regular posting schedule.

When I was away, I came up with a list of more or less necessary sewing tools. Because pressing is as important as sewing itself, the first two are pressing aids - tailor's hem and seam roll. You should press each seam after you stitch it or you'll end up with a garment that looks sloppy.

The side edges of my ham and roll wrinkle - that means that they aren't filled/firm enough.
Tailor's ham (or pressing ham) is used for pressing curved areas, e.g. princess seams, darts, collars, sleeve caps etc. Just shape it into a desired shape and use it wherever you need to. One side is covered in cotton (for pressing cotton with higher temperatures) and the other one in wool (for pressing wool with lower temperatures). 

Seam roll is used for pressing long narrow seams and is an alternative to a sleeve board. It helps you with pressing sleeves and areas of a garment that are difficult to reach. It's especially convenient for pressing seams open, because of it's shape which prevents marks of seam allowances showing on the right side of the fabric.

I made the shape for the ham by the help of this tutorial and filled it with sawdust. I should fill it with finer sawdust (almost like powder, which would make the ham firmer), but I didn't have any at hand. It works fine for now, but I'm probably going to open it once the sawdust subsides, empty it, and fill it with the powder. For the seam roll I cut rectangles 32 x 12 cm or 12-5/8 x 4-3/4 in. The measurements include 1 cm or 3/8 in. seam allowance. You can make the corners round, just as I did, or even rounder.

 
1. Cut three in cotton (white+pink stripes fabric is for lining) and one in wool. 
2. Stitch right sides together - including the lining which is facing the wrong side of each of the outside fabrics. Leave a gap open - I recommend you leave it on the narrower side of the ham/roll.
3. Make notches halfway into the seam allowances on all curved areas. 
4. Turn inside out.
5. Fill with sawdust powder (I helped myself with a cut plastic bottle with larger opening). When you think it's full - it's not. Use a handle of a kitchen ladle to stuff the ham a little more. It must be firm.
6. When you're done with filling, stitch the opening with hand stitches.

Sunday, 21 August 2011

Vacation

This week was all about patternmaking and sewing. I managed to make basic blocks for myself - at last! - thanks to my mum who took all of the uncounted measurements. I sewed a top from my own pattern and a nightgown using BurdaStyle's pattern. I will post photos after 24. August because I'm going on a vacation today. Have a nice Sunday!

Thursday, 11 August 2011

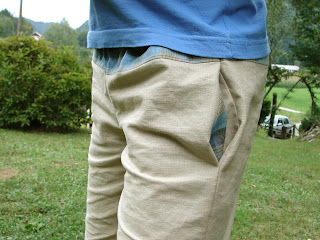
Shorts for Dominik

Meet my cousin Dominik. I sewed him a few pairs of shorts. I made a pattern using my "bible" and I added in-seam pockets. Because I didn't have enough fabric, I cut the pattern below the waist and used two different colours for each pair. Dominik was really looking forward to taking pictures, so we had a little photoshoot last weekend.


Thursday, 4 August 2011

Jeans renovation

I haven't worn boot-cut jeans for quite a time, but two pairs were still lying in my closet. I made the first pair into something between skinny and straight cut jeans. Very easy, just sew along the side seam to narrow the trouser leg. The second pair became shorts.


1. Mark desired length and add 4 cm seam allowance. Cut.


2. Fold twice.


3. Topstitch.


4. Put the trousers on and pin the lace to the edge.


5. Unpin the ends from the trousers and pin them together.


6. Stitch them, right sides together.


7. Fold lace seam allowances to one side and pin.


8. While stretching the jeans slightly, stitch the lace on both lower and upper edge with a zig-zag stitch.


9. Finished!