Thursday, 17 May 2012

Finished: trench coat

The trench coat's been finished for a while, I was just too lazy to edit the photos. This colour was so difficult to photograph! Irrespective of the camera settings, the colour never seemed right. It looks almost genuine now, after some editing.


Anyway, I'm very happy with the trench coat. It's very comfortable to wear, due to the box pleat in the back. The pattern instructions were comprehensible, except a few parts. 


As you know, I made a few alterations to the pattern. I'm the most satisfied with new fitted sleeves, which can be worn down or rolled up. I love the contrasting lining and belt buckle covered with the same fabric. The collar and lapels are 1 cm or 3/8 in. narrower and the button and buttonhole are a little higher than the instructions say.


I added a hanging loop and my signature, of course! This time I printed it directly on the fabric before sewing. Too bad you can't touch the fabric. It has a very soft, brushed hand and it's waterproof. According to Fashion for fabric, it's called polyester sateen. Have you ever worked with it?


I'll check back soon with my next project - jeans!

Monday, 23 April 2012

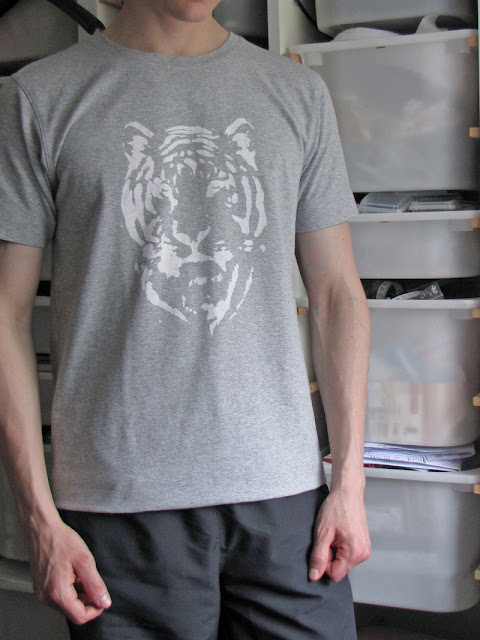
Tiger T-shirt

The trench coat isn't finished yet. I decided to order a custom-made fabric covered belt buckle and I'll have to wait for it for about a week, so let me just show you the T-shirt I made a while ago.


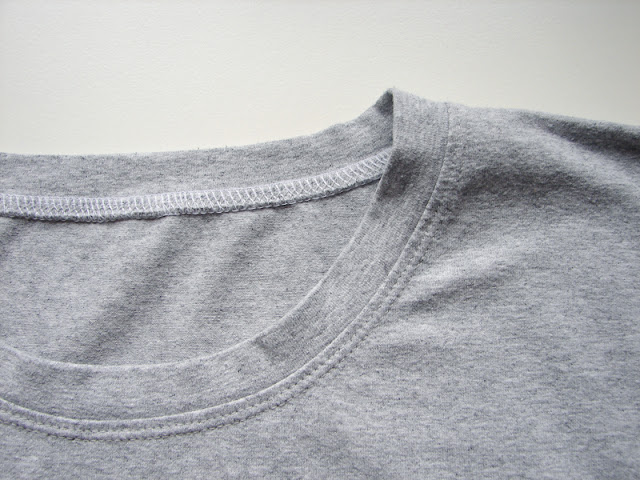
It's BurdaStyle's Pete pattern with a few modifications. It's stitched with an overlock (which I love!) and topstitched with a twin needle. I was really surprised at how quick it was finished!


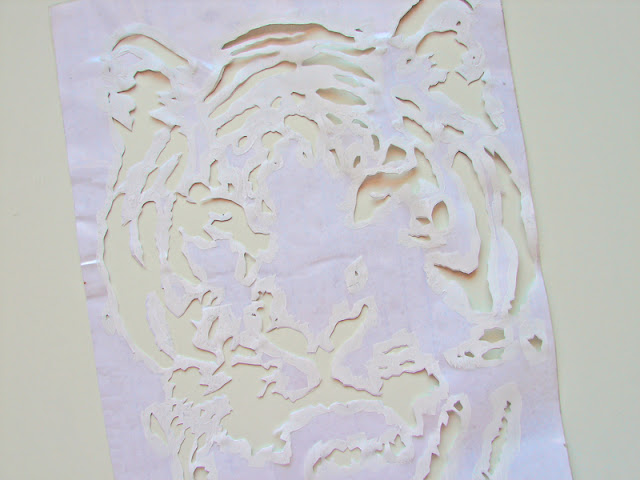
To make it special, I printed the tiger silhouette on a piece of self-adhesive foil and cut out the design with an art knife. I stuck the stencil on the T-shirt and painted it with a white textile paint. I would've used freezer paper (instead of the self-adhesive foil) to make the stencil, because it would stick better to the fabric. Unfortunately, they didn't have it in any of the shops I went to.


Sunday, 15 April 2012

Tikva trench

A little update on the trench coat. A fellow BurdaStyle member said that the pattern runs large and she had to take it in at the side seams. That's why I decided to make it in size 34 instead of 36 as usually. There were a lot of adjustments to the pattern, so I used old bed sheets to make a muslin (does anyone enjoy making muslins??). I had to shorten both bodice and skirt of the coat (as predicted), narrowed the collar and lapels, and made new, full length, fitted sleeves. In the long run, I'm happy I made a muslin, since I shortened the bodice a little too much at first. :) 


Gotta go back tracing pattern markings on the real fabric ... Have a nice Sunday!

Thursday, 5 April 2012

Handmade wardrobe: spring 2012

A lot of clothes that I make for myself don't go well together with bought garments. That's either because of the specific colour or due to the style of my handmade pieces. Clothes that I buy are usually more casual than clothes that I make. That's why I decided to make a plan. I won't sew separate garments, I will make outfits. In the next two months and a half I will make (or at least I hope so!) three outfits and a trench coat, which will be the first project in a row. Let's take a look ...


Whew, that's eight garments total and I'll take you through various construction stages of each and every piece. I'll be using bought patterns for three of them and making my own for the rest.

Ready, set, go!

Sunday, 25 March 2012

Spring bag with a bow

Made for a friend who's crazy about pink colour, this bag is the perfect way to greet the spring. I used the same pattern as for the floral bag, with a few modifications. I omitted the gathered top of the bag, added a big bow, and made the strap wider. The inside of the bag has two separated compartments and two pockets for small articles such as phone, lip balm, hankies or keys. It closes with a zipper and it can be worn either in a hand, on a shoulder, or cross body. I used white findings and decorative buttons to keep the tender look of the bag, and added my label as well.


Monday, 19 March 2012

Bags, bags, bags

I took some pictures of the finished bags and of another one on the way.


This is the bag I made from my own pattern. Even though it isn't interfaced, it wears well. I added a zipper for the opening.


The BurdaStyle bag turned out sooo lovely. I would've kept it, if it wasn't made for a friend's birthday. :)


This is what I'm making now. It's for a friend who gave me an incredible pile of fabric.

All I've been making this year were different accessories like bags and make-up bags. I can't wait to start sewing a real garment. Should happen next week ...

Sunday, 11 March 2012

BurdaStyle bag

The BurdaStyle Sewing Handbook came into mail in late December and lately I've been reading it and writing a review. I intended to make a bag for a friend and the beautiful bag variation Chie at Vivat Veritas made for the book seemed just perfect. I wanted it to be violet, but I couldn't find the right colour in the fabric shop. Lastly, I picked wool fabric in a versatile neutral colour. I made a few changes to the pattern and sewed in a handmade label for a more professional look.


Sunday, 12 February 2012

Overlock machine

I got an overlock sewing machine, yay! :) I bought it a few months ago. Since Janome celebrated the 90. anniversary in 2011, I also got a bunch of sewing feet as a gift.


I was pretty confused by all the threads and buttons the first time I used it. The instruction manual contains only basic information and directions. But I got myself a book to help me understand the settings for different stitches and their use. I have already sewn jersey (amazing, a T-shirt was made in no time!), cotton, cotton batiste, and polyester blend. I made a few stitches on satin and chiffon as well. I love how flat and neat the seams are now. It's a great machine!


Thursday, 2 February 2012

On my sewing table

This is what I've been sewing lately - a bag. I'm using printed cotton canvas that I bought last year, rayon lining in cream colour, white lace, and brass findings. The bag will have two handles and an adjustable cross body strap. I've already made a little mistake - I didn't use interfacing on bag's two main pieces. I thought the fabric itself would be enough, but I'm not so sure any more.


What's on your sewing table?

Tuesday, 31 January 2012

2011 review

I did a little investigation of my sewing practice. Although I didn't reach my goal of completing 52 projects in 2011, I'm pretty satisfied with the outcome. Making one project a week turned out to be rather impossible for me. Not because I wouldn't have time, but because I tend to take up so many tasks at once instead of focusing on just one or two. In the end nothing gets done. That shall change in 2012. Focus!


P.S.: Happy New Year! ;)

Saturday, 31 December 2011

Happy Holidays!

Dear readers, thank you for your visits and lovely comments.

Wednesday, 30 November 2011

Sewing notions: snips

Here's another indispensable tool for seamstresses: the snips. I keep them in my sewing machine's accessory tray so they are always at hand. You might be wondering how to hold these. Put the middle finder through the loop, the index finger underneath the snips and the thumb on top, squeeze and snip! Although, if you have smaller hands, you'll probably feel more comfortable with the ring finger in the loop.


They are perfect for snipping threads off the garment right after stitching each seam. It's much easier and quicker than using regular scissors. I also use them to make notches on fabric.

There are many variations of snips: chrome-plated, snips covered in plastic and snips without the loop. Again, I recommend buying quality snips, they will cut better and last longer. Mine are more than 20 years old and still snip like a charm.

Thursday, 3 November 2011

Ceremonials

I'm finally getting better! As you know I had one of my wisdom teeth (three more to go) surgically removed last Monday. After that Mr. Dry Socket paid a visit and decided to interrupt the process of healing of my tooth extraction site. Painkillers helped a lot but made me drowsy as well. I spent most of the previous week in bed, watching TV. Except on Tuesday, 25. October, when I went to the Florence + the Machine gig.


Well, a virtual gig. :) I bought myself a ticket for my birthday. The concert was streamed live from Hackney Empire, London. Streaming was HD quality, the picture only froze a couple of times and the sound was amazing. The band launched their new album Ceremonials which was released on 31. October. It's a bit different than the first album, Lungs. It's definitely darker. I knew all of the songs before the gig (the album leaked) and my favourites are All this and heaven too, Shake it out, Never let me go, No light, no light, Only if for a night, and What the water gave me. As a matter of fact, the whole album is exceptional. This was the second time I saw Florence singing live and it was an overall wonderful experience. 


Besides her singing I also loved Florence's silk peach dress (I always love her dresses). I did a little research and it's a part of Temperley London's SS 2012 collection. Actually, it's shorts and a jacket. Florence completed them with a lace top and I think it suits her much more than it suits the model below.

Temperley London SS 2012

Did anyone of you go to the gig or watch the live stream as well? Do you like Florence's style?

Monday, 24 October 2011

Quick update

Hey readers! I had a wisdom tooth extraction just two hours ago so I'll be really quick. Remember The BurdaStyle Sewing Handbook I told you about? It's coming out on 1. November, but you can already take a peek inside it right here. There are also some videos from contributors and you can see technical drawings of the projects too. The book will be available as a hard copy and as an ebook as well.


Wednesday, 19 October 2011

Sewing notions: seam ripper

Seam rippers are like scissors - they get dull after some time of use. Get a new one when that happens.

When you start sewing, you'll have to learn how to rip seams correctly too. There are probably a few ways to do this, but this one has worked for me since I started sewing. It rips seams quickly and it doesn't damage the fabric.


1. First, rip the double stitches at the beginning of the seam as shown in the picture.


2. When you're done with double stitches, gently pull the fabric pieces apart. As you pull, threads of the seam will show.


3. Rip the threads that are visible. Pull apart and rip ahead. Continue until you get to the other end of the seam (double stitches) and repeat the first step. Remove pieces of the thread.

You can also rip the seam using the first step only. Just unpick every third or fourth stitch on one side of the seam. When you do that, pull the thread on the other side of the seam and brush aside remaining pieces of thread.

Another way of using seam ripper is cutting holes for buttonholes. Seam ripper has to be sharp if you want to make this one happen.


1. Make a machine buttonhole. Push the sharp point of the seam ripper in the beginning of the buttonhole and push it out in the middle of the buttonhole. Be careful that you don't rip any stitches of the buttonhole. Push the seam ripper ahead to cut the fabric and make half of the hole.


2. Do the same on the other end of the buttonhole. Snip off little pieces of fabric threads and you'll have a beautiful buttonhole. Amazing, right?

P.S.: I just noticed that my blog celebrated 1 year a few days ago! I'm preparing a giveaway, so make sure you come round. :)

Sunday, 25 September 2011

Sewing notions: cutting tools

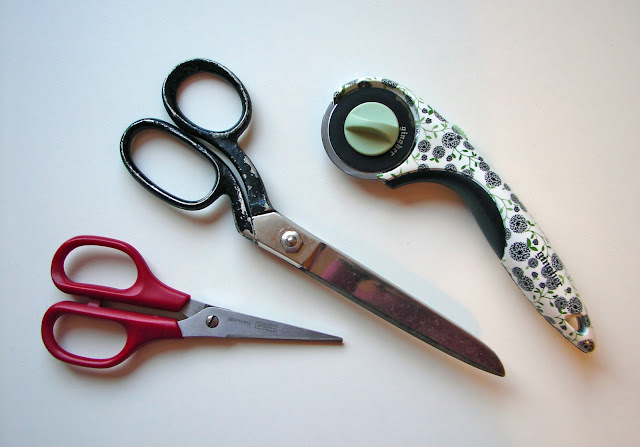
My cutting tools from left to right: paper scissors, dressmaker's shears, 45 mm rotary cutter

Cutting tools are one of the most important sewing notions. First, you need a pair of scissors for cutting paper or cardboard patterns. They can be regular sharp paper scissors or special pattern shears, which are heavy duty and make cutting oak tag paper much easier.

Heavy duty pattern shears

The second ones are dressmaker's shears. Use them for fabrics only, since paper makes them blunt. I recommend investing in a more expensive pair which can be sharpened and generally lasts much longer. However, some people prefer lighter shears with plastic handles. Those usually can't be sharpened and therefore need to be replaced more frequently. The ones that I have are actually my mum's and are more than 25 years old, but still cutting almost like new. If I'd be buying a new pair, I'd definitely go for Ginghers.

An alternative (or addition) to dressmaker's shears is a rotary cutter - my favourite. There are more blade sizes available. The biggest (60 mm) is used mostly for cutting long, narrow lines (fabric pieces for quilts). The medium size (45 mm) is the most versatile and can be used for cutting fabric for clothes. It's amazing for cutting slippery fabrics such as charmeuse or chiffon. No problems with the curves, as long as they aren't too fine. This is what the smallest (28 and 18 mm) are for - lots of details, curves, inward pointed corners etc. Some people recommend having separate blades for cutting natural and artificial fibres, since the latter tend to blunt the blade much faster. Also, for cutting with a rotary cutter, you will need a cutting mat or a plate of linoleum. 

There are also the so-called pinking (zig-zag) shears, which are used to prevent unravelling of the unfinished edges of the fabric. They come in handy when sewing jackets or coats. The seam allowances (of both garment and lining) don't have to be finished with an overlock or zig-zag stitch, because they aren't visible after you stitch the lining to the garment. You can just trim them with pinking shears. I don't have them yet, but a pair of Ginghers is already on my wishlist.

Pinking shears

Wednesday, 21 September 2011

Time

Now that I completed my studies I have so much time, but still - time goes by so fast when you search for jobs and write applications. But there's still enough time for sewing. When I started sewing I used my mum's ironing board. After a while I bought my own in Ikea - a mini tabletop ironing board.


So, after using it a two years or so it became pretty dirty. The main reason for this is fusible interfacing (note to self: protect the board every time you use it). The glue didn't go out even after washing. Then I decided to make a new cover. Ok, I admit, the old cover got a bit boring, too. I traced the old cover onto the paper and cut it in fabric. I used bias tape for the edges. I left 2.5 cm/1" opening left on the wrong side of the fabric so I could insert a string into the tunnel. Then I just put the felt and the cover over the board, pulled the string tight and tied a knot.


I still have to buy some cotton felt, because the felt that came with the board became very thin and therefore leaves marks on the fabric when you iron it. Not good. Anyway, I love the new cover and I'm already planning to make a few more to stock when this one needs washing.

Friday, 16 September 2011

Sewing notions: tailor's ham & seam roll

I had a wonderful vacation and a few lovely weeks of procrastination after it. But I'm back now, with a regular posting schedule.

When I was away, I came up with a list of more or less necessary sewing tools. Because pressing is as important as sewing itself, the first two are pressing aids - tailor's hem and seam roll. You should press each seam after you stitch it or you'll end up with a garment that looks sloppy.

The side edges of my ham and roll wrinkle - that means that they aren't filled/firm enough.
Tailor's ham (or pressing ham) is used for pressing curved areas, e.g. princess seams, darts, collars, sleeve caps etc. Just shape it into a desired shape and use it wherever you need to. One side is covered in cotton (for pressing cotton with higher temperatures) and the other one in wool (for pressing wool with lower temperatures). 

Seam roll is used for pressing long narrow seams and is an alternative to a sleeve board. It helps you with pressing sleeves and areas of a garment that are difficult to reach. It's especially convenient for pressing seams open, because of it's shape which prevents marks of seam allowances showing on the right side of the fabric.

I made the shape for the ham by the help of this tutorial and filled it with sawdust. I should fill it with finer sawdust (almost like powder, which would make the ham firmer), but I didn't have any at hand. It works fine for now, but I'm probably going to open it once the sawdust subsides, empty it, and fill it with the powder. For the seam roll I cut rectangles 32 x 12 cm or 12-5/8 x 4-3/4 in. The measurements include 1 cm or 3/8 in. seam allowance. You can make the corners round, just as I did, or even rounder.

 
1. Cut three in cotton (white+pink stripes fabric is for lining) and one in wool. 
2. Stitch right sides together - including the lining which is facing the wrong side of each of the outside fabrics. Leave a gap open - I recommend you leave it on the narrower side of the ham/roll.
3. Make notches halfway into the seam allowances on all curved areas. 
4. Turn inside out.
5. Fill with sawdust powder (I helped myself with a cut plastic bottle with larger opening). When you think it's full - it's not. Use a handle of a kitchen ladle to stuff the ham a little more. It must be firm.
6. When you're done with filling, stitch the opening with hand stitches.